What you'll need
In my experience, if you gather all the information you need in advance, activating your UI account yourself (Part 1) takes about 30 minutes. You'll need all of the information listed above under Method 1, plus the following:
- Your Unemployment Assistance Employer Account Number (EAN), which is an 8-digit number the DUA assigned to your business back when you (or your payroll service) started reporting wages to them; this number is usually written in the form NN-NNNNN-N, and it does not appear in the DUA letter announcing QUEST; the easiest place to find it is on the quarterly tax reports from your payroll service (under "Unemployment ID" or "MA Unemployment ID Number"), or the annual Unemployment Insurance Contribution Rate letter that the DUA mails to you each January (under "Employer Number"). If you still can't find this number, I'd call your payroll service or the DUA because you cannot get the process started without it.
- Your business address and phone
- The 2-digit TPA ID number for your payroll service, if you use one; you'll use this to authorize them to be your Third Party Administrator so they can file your wage reports and payroll taxes with the DUA on your behalf
- Your payroll service's phone number, if you use one; mine was very helpful during this process
Here are the steps to set up your account. I suggest you print these instructions for easier reference.
Part 1: Activating your UI account yourself
Step 1: Open your web browser and go to
http://www.mass.gov/uima - You'll land on the "DUA QUEST" web page (see picture, below). If you get an error, there is a note on this page that may mean it's only available Monday through Friday, 7 a.m. to 7 p.m. Eastern time, excluding weekends and holidays. If you're unable to use it, try again during these hours.
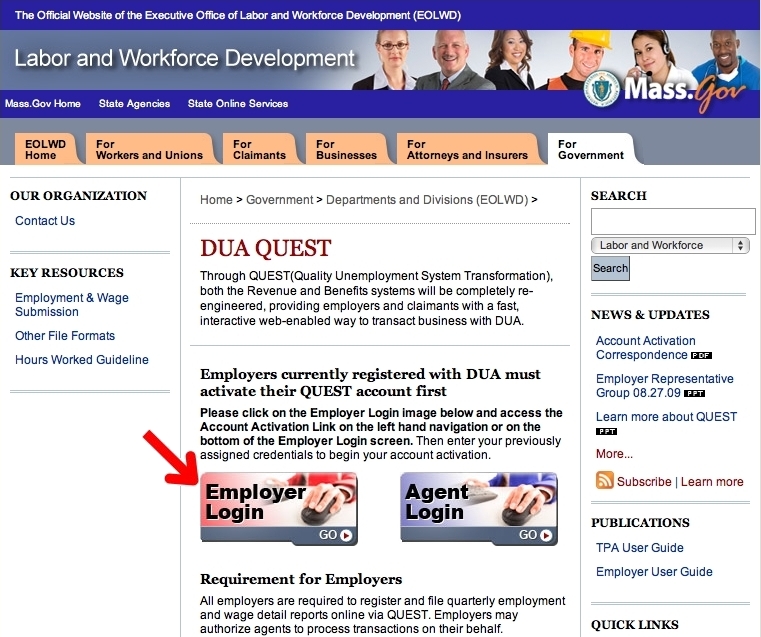
Step 2: Click once on the "Employer Login" button. This will take you to the "Massachusetts Division of Unemployment Assistance: Employer Login" page.
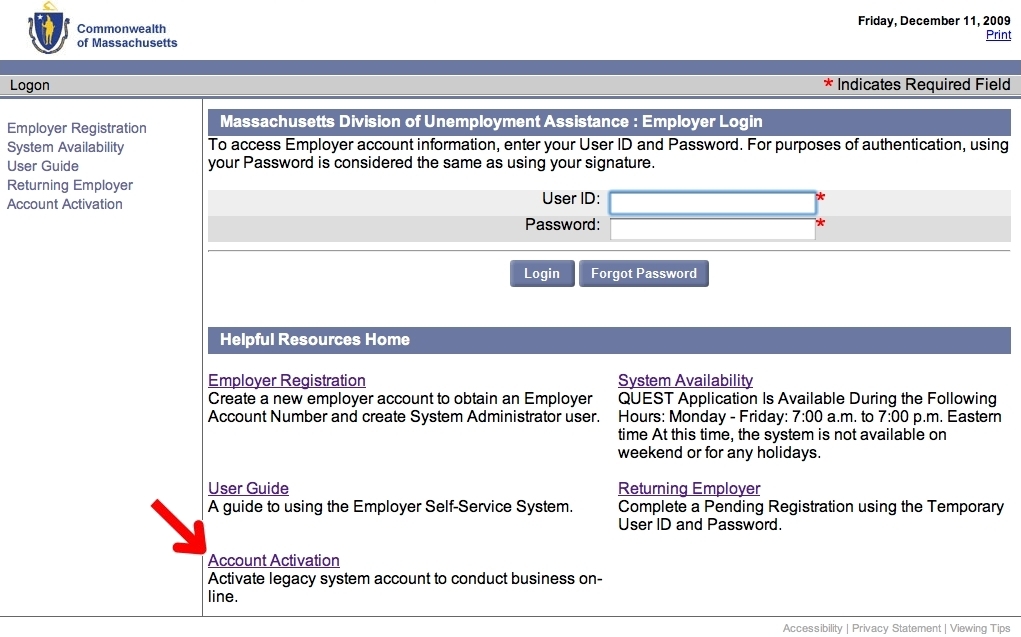
Step 3:
Don't type anything in the "User ID / Password" fields--you don't have a User ID yet! Instead, click once the "Account Activation" link (underlined) at the bottom left.
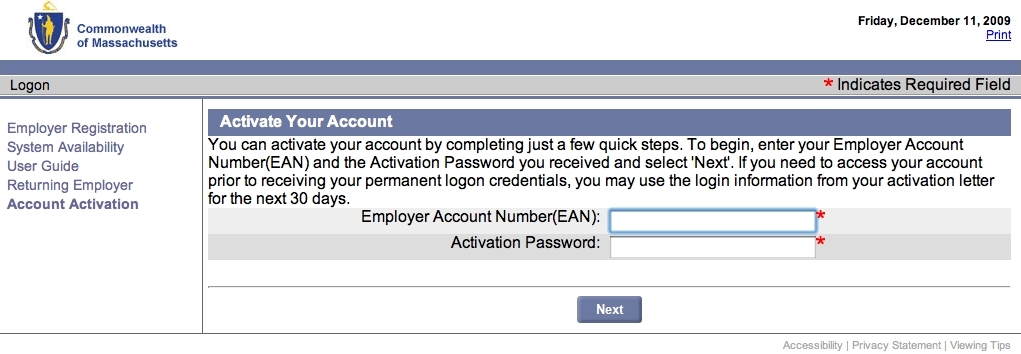
Step 4: You'll land on the "Activate Your Account" page. In the "Employer Account Number(EAN)" field, type your 8-digit EAN, without any dashes. In the "Activation Password" field, type your Temporary Password from the DUA letter announcing QUEST. Click once on the "Next" button.
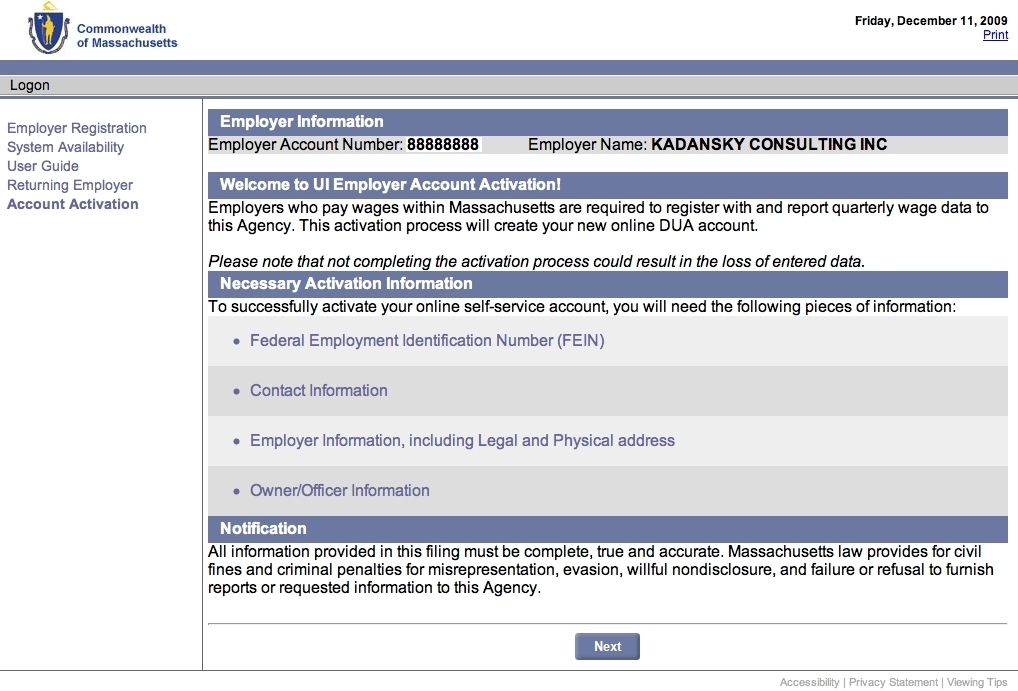
Step 5: You'll land on the "Welcome to UI Employer Account Activation!" page. Click once on the "Next" button.
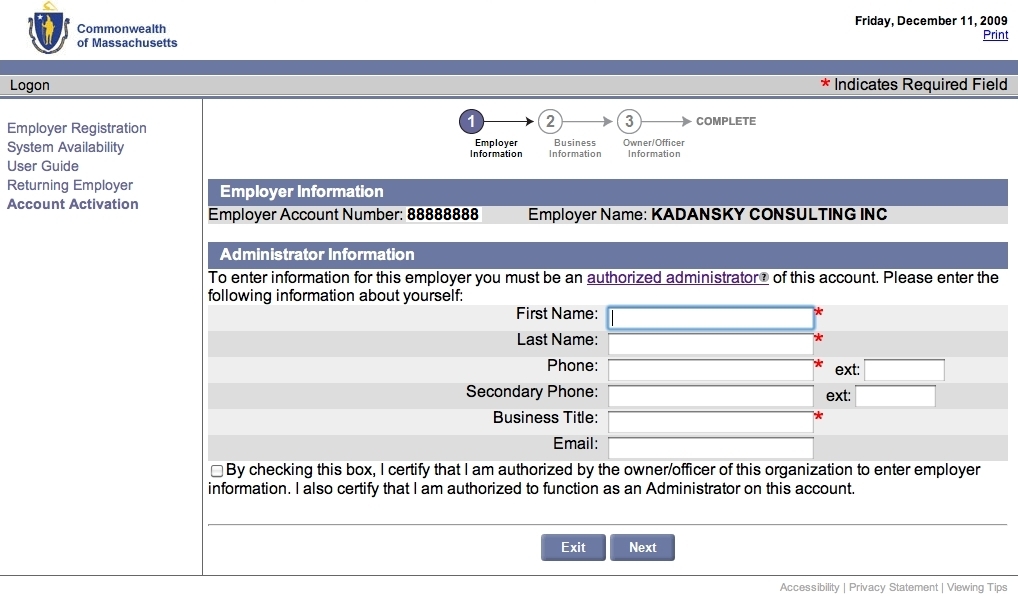
Step 6: You'll land on the "Administrator Information" page. You must fill in the fields marked with red asterisks (*), the other fields are optional. Don't type spaces in your phone numbers, only dashes. Click once on "By checking this box...," then click once on the "Next" button.
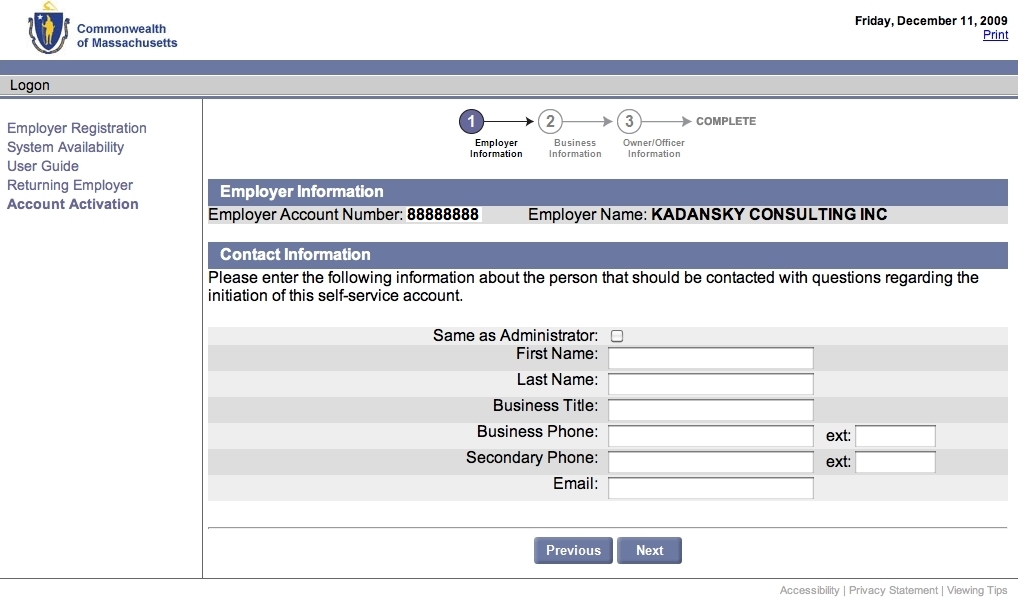
Step 7: You'll land on the "Contact Information" page. If the Administrator should also be contacted if the DUA has any questions about your activation, click once on the "Same as Administrator" checkbox. Otherwise, leave it unchecked and fill in the correct name and contact information. Then, click once on the "Next" button.
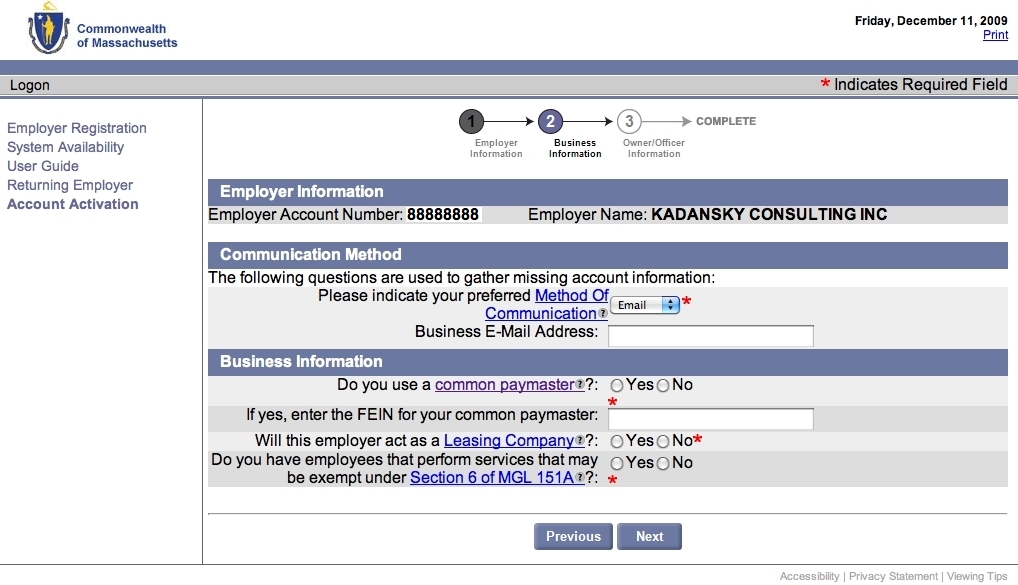
Step 8: You'll land on the "Communication Method" page. If you prefer to be contacted via email, simply fill in your email address. If you prefer to be contacted by mail, click on "Email" and change it to "US Mail," and leave the E-Mail field blank.
Step 9: Under "Business Information," most small business would answer "No" to all three questions (Use a common paymaster? Act as a Leasing Company? Have employees that perform services that may be exempt under Section 6 of MGL 151A?), but if you're not sure, check with your payroll company or accountant. Then, click once on the "Next" button.
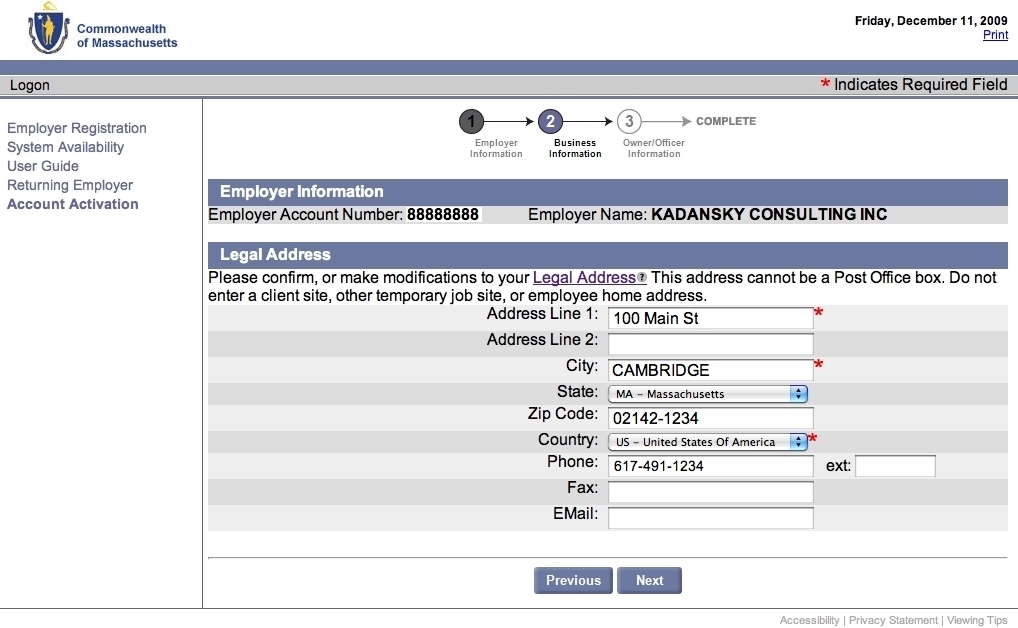
Step 10: You'll land on the "Legal Address" page. You'll see the legal address on file with the DUA. Make any corrections if appropriate. You must fill in the fields marked with red asterisks (*), the other fields are optional. Don't type spaces in your phone numbers, only dashes. Then, click once on the "Next" button.
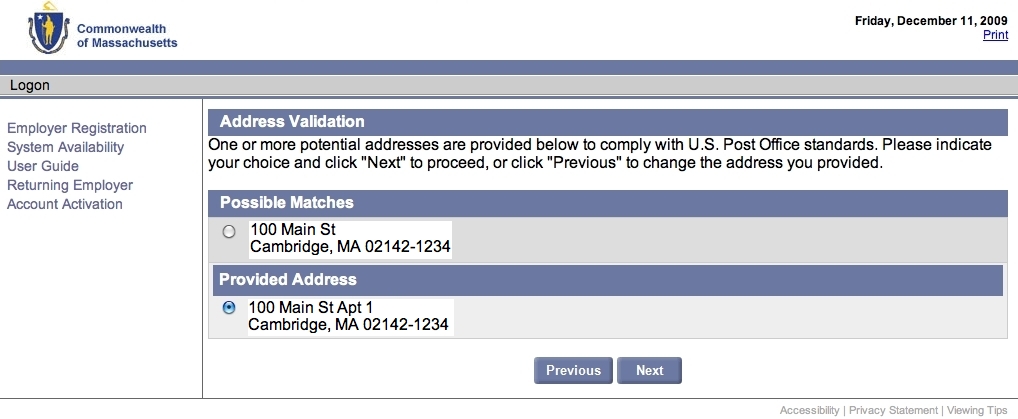
Step 11: You may land on an "Address Validation" page. Click the radio button (little circle) next to the most accurate street address listed, and then once on the "Next" button.
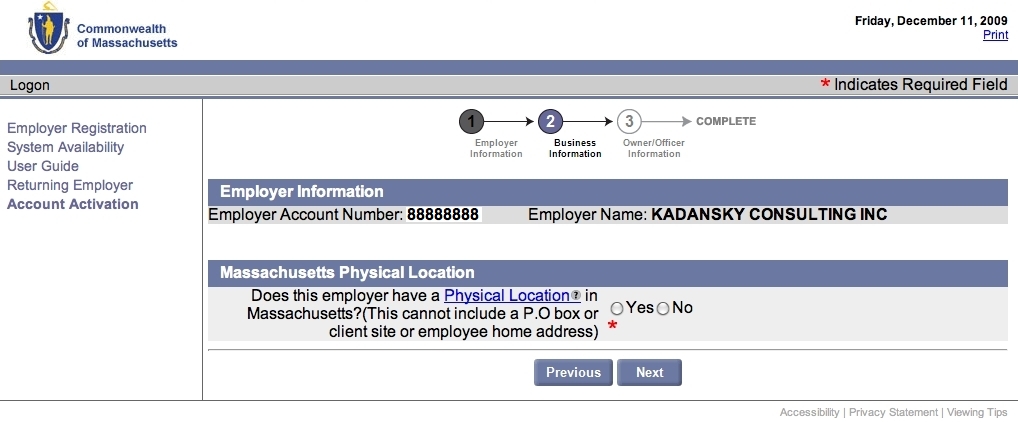
Step 12: You'll land on the "Massachusetts Physical Location" page, asking if your business is physically located in Massachusetts. If so, click once on the "Yes" radio button, and then once on the "Next" button.
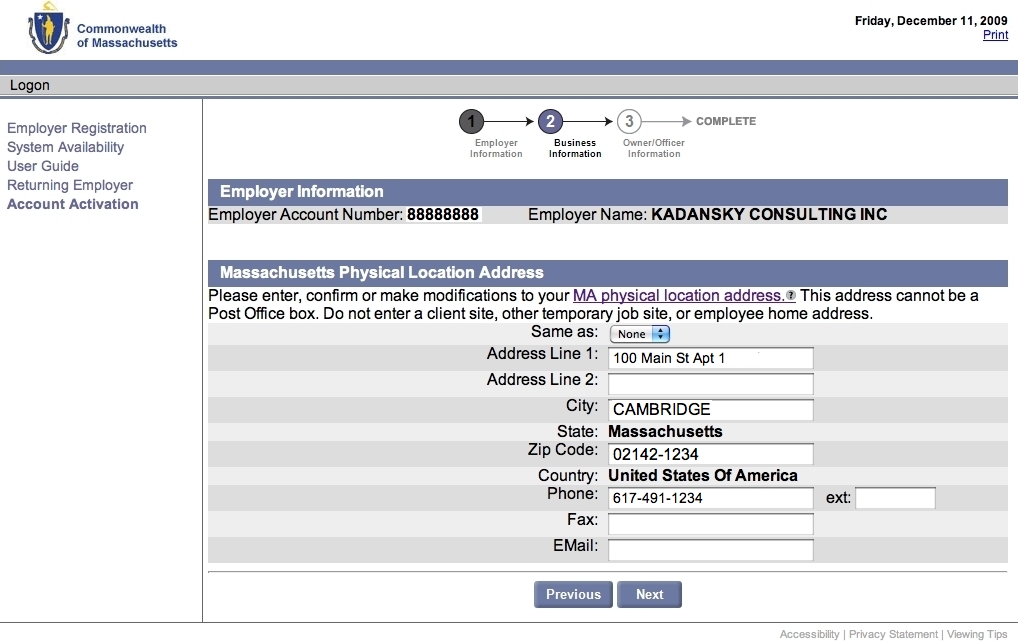
Step 13: You'll land on the "Massachusetts Physical Location Address" page. You'll see the address on file with the DUA. Make any corrections if appropriate, or if your Location is the same as your Legal address, next to "Same as" click once on "None" and change it to "Legal." Then, click once on the "Next" button.
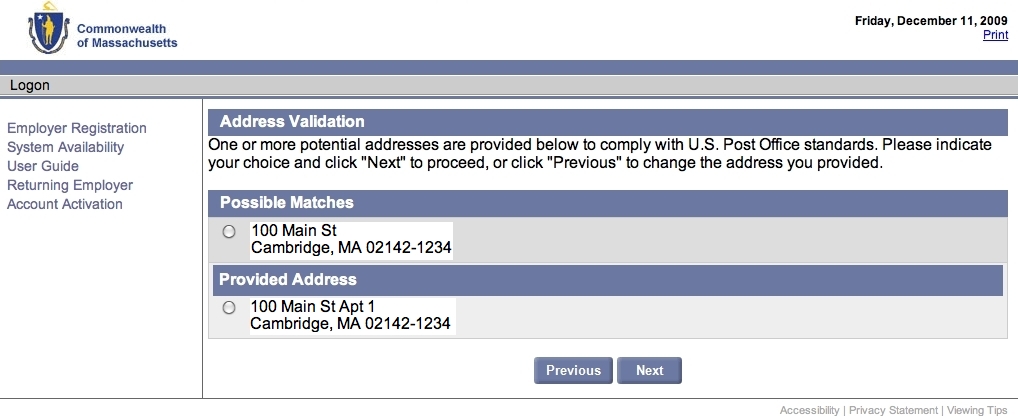
Step 14: You may land on an "Address Validation" page. Click the radio button (little circle) next to the most accurate street address listed, and then once on the "Next" button.
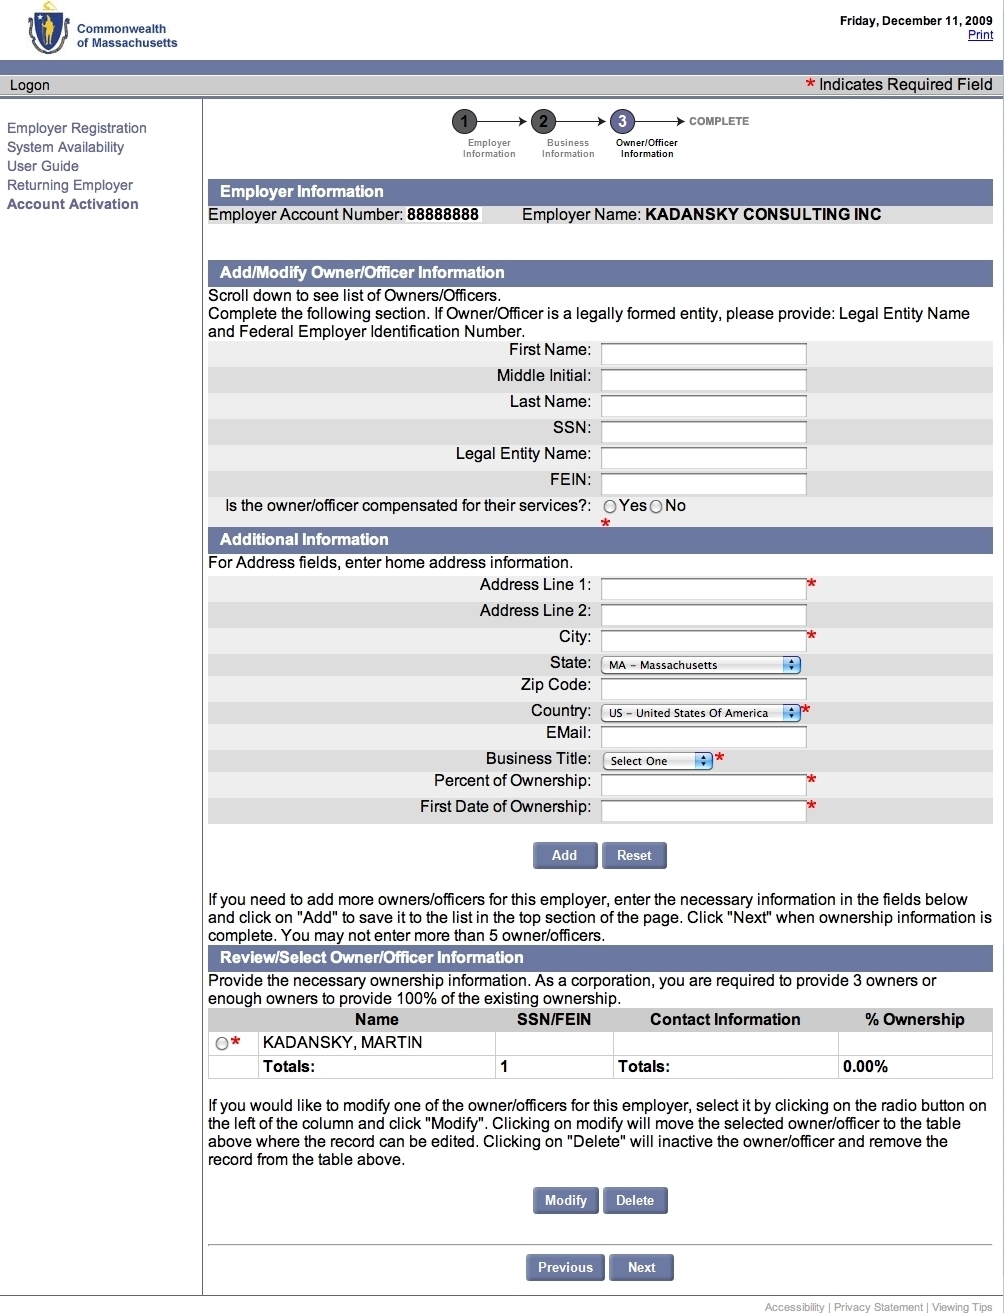
Step 15: You'll land on the "Add/Modify Owner/Officer Information" page.
Don't type anything in just yet! Instead, scroll to the bottom of the page to the list of business owners under "Review/Select Owner/Office Information." You'll probably see your name listed, with no SSN, no Contact Information, and no % Ownership. Click once on the radio button (little circle) to the left of your name, then click once on the "Modify" button.
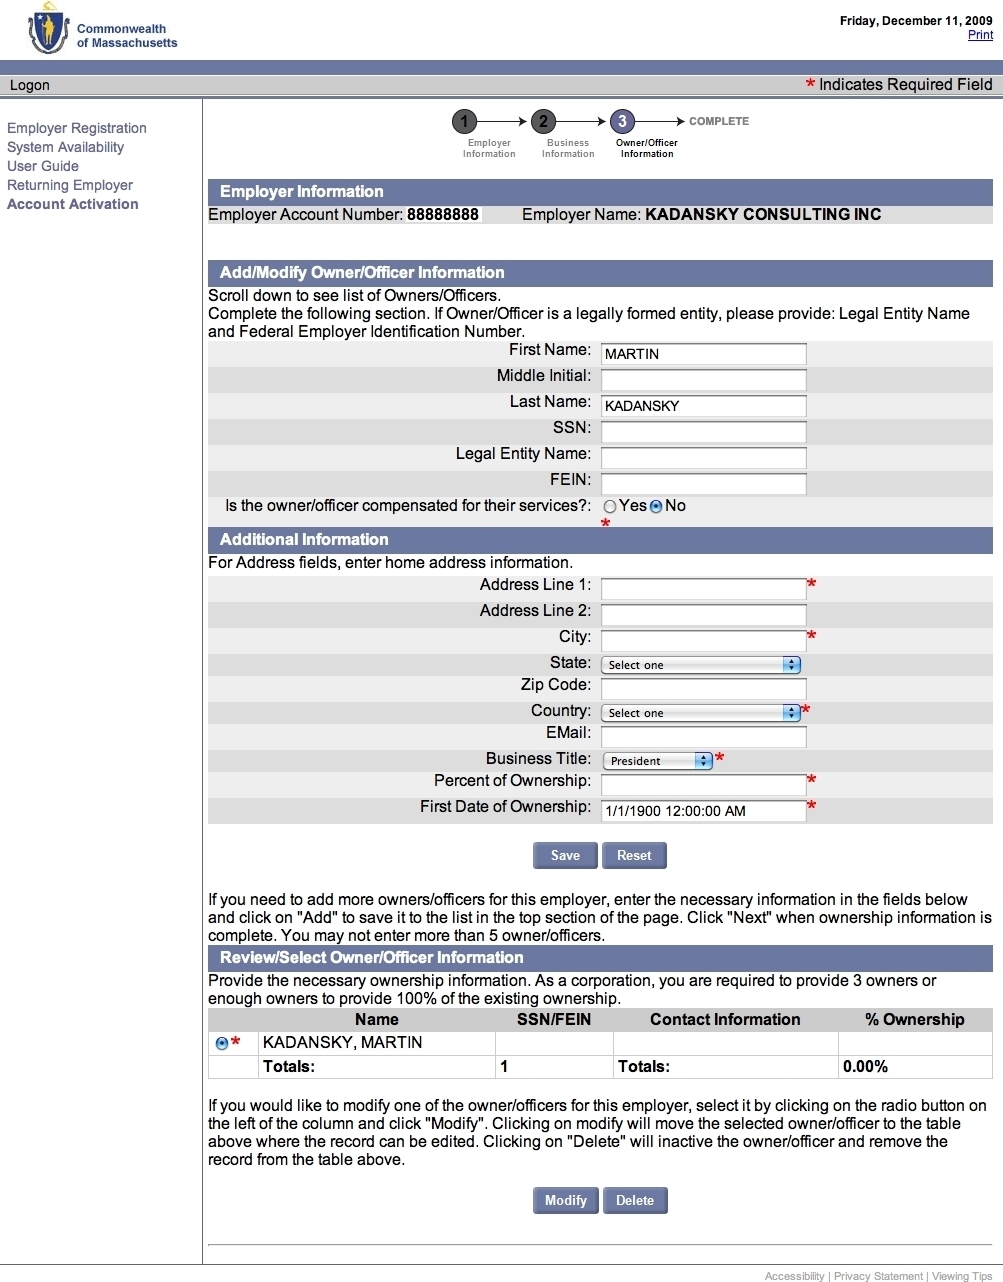
Step 16: The same page will reload, and you should see your name in the fields under "Add/Modify Owner/Office Information." Enter your social security number in the SSN field. If you are paid through your business' payroll, click "Yes" next to "Is the owner/officer compensated for their services?", otherwise click "No."
Step 17: Under "Additional Information," enter your home address, click on "President" and choose your Business Title, enter your Percent of Ownership (100 for a Sole Proprietor), and First Date of ownership (month/day/year). Then, click once on the "Save" button.
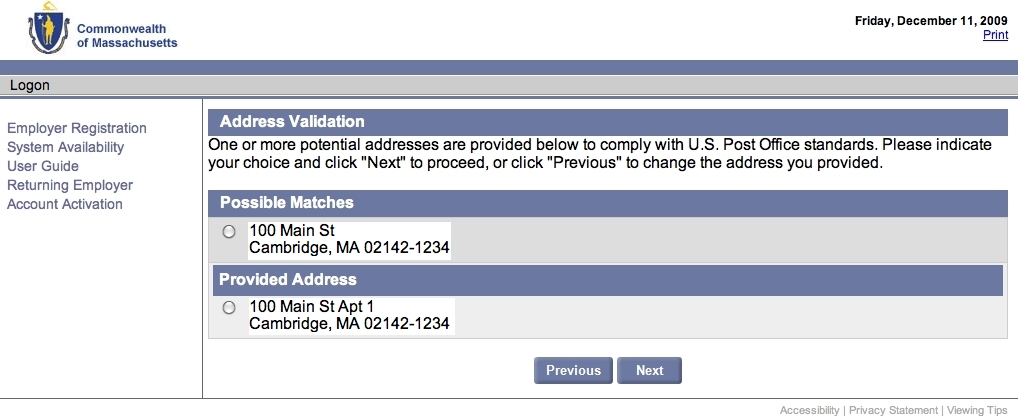
Step 18: You may land on an "Address Validation" page. Click the radio button (little circle) next to the most accurate street address listed, and then once on the "Next" button.
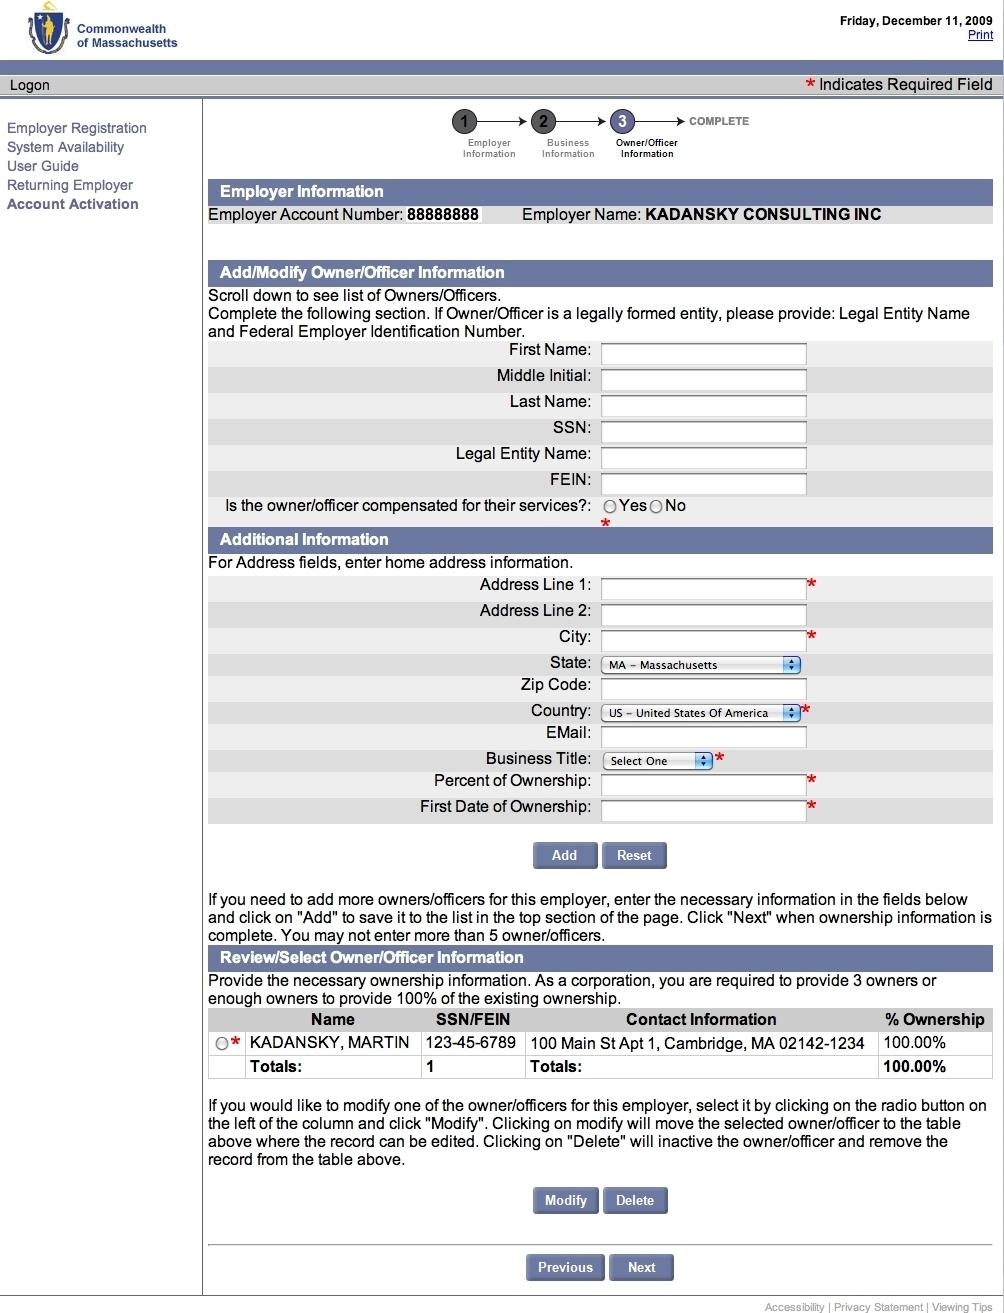
Step 19: The same page will reload. Scroll to the bottom of the page to the list of business owners under "Review/Select Owner/Office Information." You'll probably now see your name listed, with your SSN, your home address, and your correct % Ownership. If you need to enter additional owners, scroll back to the top and enter the next owner. Otherwise click once on the "Next" button.
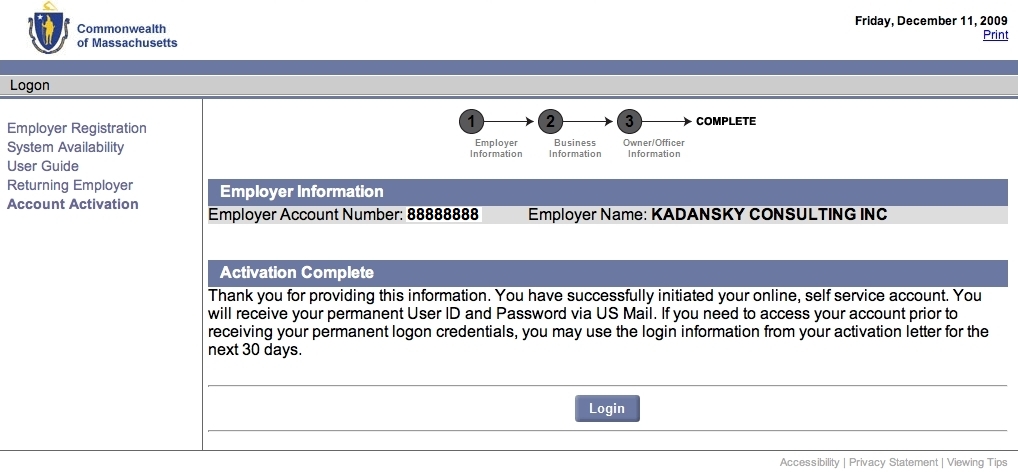
Step 20: You'll land on the "Activation Complete" page, confirming that you'll receive your permanent User ID and second Temporary Password via US Mail. Do
not click the "Login" button, since you won't be able to log in until you receive this information in the mail from the DUA. Instead, close your browser, you've finished Part 1.
Part 2: Finish setting up your UI account yourself
When you receive the information packet containing your permanent User ID and another Temporary Password that the DUA will mail to your business address:
Step 1: Open your web browser and go to
http://www.mass.gov/uima
If you get an error trying to load this web page, there is a poorly phrased note on it that may mean it's only available Monday through Friday, 7 a.m. to 7 p.m. Eastern time, excluding weekends and holidays. If you're unable to use it, try again during these hours.
Step 2: Click once on the "Employer Login" button. This will take you to the "Massachusetts Division of Unemployment Assistance: Employer Login" page.
Step 3: In the "User ID" field, type your permanent User ID. In the "Password" field, type the corresponding Temporary Password, then click once on the "Login" button.
Step 4: You'll land on the "Reset Password" page. In the "Current Password" field, type your Temporary Password, and in the "New Password" field type the new password you'd like to use. Type it again in the "Re-enter new password" field. Pick a security question, enter the corresponding Security Answer, and enter a 4-digit PIN Code. Write this information down in a safe place, then click once on the "Save" button
Step 5: You'll land on the "Employer Home" page. Click once on the "Account Maintenance" link (underlined).
Step 6: You'll land on the "Account Maintenance" page. Click once on the "Third Party Administrator (TPA) Authorization" link (underlined) at the bottom of the page.
Step 7: You'll land on the "Third Party Administrator (TPA) Authorization" page. Click once on the "New" button.
Step 8: You'll land on the "Assign Third Party Administrator (TPA)" page. In the "TPA ID" field, enter the 2-digit TPA ID number for your payroll service, then click once on the "Next" button.
Step 9: You'll land on the "Third Party Administrator (TPA) Information" page. In the "TPA Services Begin Date" field, enter the date that your payroll service will begin performing services for you. Leave the "End Date" field blank. In the list under "Un-assigned Roles," your payroll service should be able to tell you which Roles they need you to assign to them. Click once on each corresponding checkbox to select it. Then, click once on the "Save" button.
Step 10: Close your browser.
Step 11: Give your permanent User ID and Password to your payroll service.
That's it, you've finished setting up your UI account!